Lesson/Workshop suggestion - CUBES
This teaching proposal is very general and must be adapted individually to the learning group. It is intended to be a framework that can be modified and expanded as required. Concrete examples and questions in the individual phases should be seen as exemplary suggestions.
short overview
- Topic: cubes
- Grade, subject:
- Duration: 1 lesson
- Material for students: GeoGebra Applet
- Additional materials:
didactical background
The language of mathematics is logic. A correct use of logic is one of the keys for understanding and mastering mathematics.
Using pioneering teaching aids in mathematics lessons, like 3D printed materials, can be quite helpful for students. Reasons are, that they encourage thinking, require practical action and enable independent thinking.
Individual work phases of students should awaken the child's desire to play, create a positive attitude towards mathematical work and promote the joy of thinking.
Phases in partner work should be available to the students for free choice. However, they promote the linguistic action and social learning of the students.
Depending on the way in which the topic is dealt with, the students learn communicating pragmatically, listening to each other, dicussing in a factual way, working on a problem in teams and presenting their own proposed solutions.
aim of the lesson
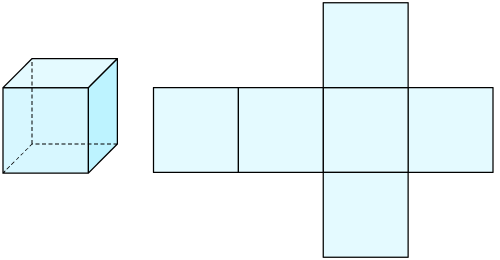
By constructing an edge model of a cube, the students should become aware of the specific characteristics of this body and deepen their already acquired knowledge. (--> enactive phase)
The pupils should first try to find different cube nets, draw them and finally build cubes with the provided material.
activity/lesson/workshop sequence
Overview:
- communication/presentation
- implementation
- reflection
- evaluation (concerns only the teacher)
- transfer
Step 1: communication/präsentation
teaching methods:
- direct instruction/teacher's lecture
- class discussion
- What is a cube?
- What parts does a cube consist of?
- ...
Step 2: implementation
teaching methods:
- individual work
- group work
- Find out which geometries you can see in combination.
- Turn a cube upside down and think about specific characteristics.
Step 3: reflection
teaching methods:
- individual work
- class discussion
- What did I already know before?
- What was new for me?
- How did I like group work?
- Could I explain the learned contents to other group members?
Step 4: evaluation
teaching methods:
- class discussion
- individual work
- Did the students understand the topic?
- Could the students now explain it to other students?
- How did I feel while teaching?
- Where there any problem situations? If yes, why? What was the reason? How did I deal with it?
Step 5: transfer
The students make simple models and sort geometric solids, like cubes, cuboids, ... by different characteristics.
The students make a table in which they sort the geometric solids and describe them with technical terms and their characteristics:
e.g. CUBE: corners [8], edges [12], surfaces [6], ...